PS Simple Scripts

July 17, 2018

Exchange Transport Service stops after installing July 2018 Updates

Filed under: General — telnet25 @ 1:27 pm

After installing Windows security updates KB4338823 and KB4338818, Transport service on Exchange 2010 Sp3 servers will stop processing mail. When this article is written MS has confirm this as an issue (bug) and confirmed the patch is on its way. Both updates seem to be causing issues with TCP/IP stack which then affects Exchange application, transport issues.

As of now you should uninstall both updates and wait for MS to come up with another KB which KB4338823 and KB4338818 broke at the first time.

Oz Casey, Dedeal

Principal Systems Engineer

https://simplepowershell.blogspot.com/  (blog)

https://smtp25.blogspot.com/ (blog)

https://telnet25.wordpress.com/ (blog)

https://twitter.com/Message_Talk (Twitter)

June 8, 2018

Windows 2012 R2. The File Replication Service has Stopped after taking an assertion failure.

Filed under: General — telnet25 @ 12:39 pm

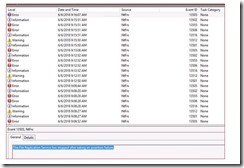
On the Domain controller event logs 13505 13555, 13506 present as shown below. NTFRS service could be in stopped state and re-starting NTFRS service will cause it to fail.

The issue most likely caused by corruption on the FRS Jet database or its Jet database log file

clip_image002

Cause: Corruption within NTFRS database or with logs.

Solution: Make sure NTFRS service is stopped.

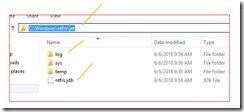
1. Navigate to NTFRS folder directory

2. Rename folder to OLD-NTFRS

3. Re-start NTFRS Service

4. Observe the service and event logs

clip_image004

Oz Casey, Dedeal

Principal Systems Engineer

https://simplepowershell.blogspot.com/  (blog)

https://smtp25.blogspot.com/ (blog)

https://telnet25.wordpress.com/ (blog)

https://twitter.com/Message_Talk (Twitter)

May 1, 2018

Installing newest CU and dealing with .NET upgrade

Filed under: General — telnet25 @ 11:51 am

Microsoft has dropped out Service pack model and start using cumulative updates (CU) while back.

You can read more about it on this article. If you are not on the latest CU , most of the last living on premises clients will not be wanting to implement latest CU on their on prem Exchange Servers, due to it is buggy reputation. Remember how many times newest CU broke Exchange more than it claimed to fix. You need to make sure .NET frame work is supported by the version of Exchange + CU version you have. Very recently, I have encounter interesting finding, what MS is recommending. Here is an example, you are running E2016 on prem with CU7 and wanting to go to CU8, and the latest CU version is CU9. MS did recommend CU8 has caused so many issues therefore CU9 is more applicable. At the time this article is written, there are no known major issues with CU9.

This year July the 1th upcoming CUs will require .NET 4.7.1, so you would think your upgrade logic will tell you install CU9 then upgrade .NET to 4.7.1. Since .NET 4.7.1 is not supported by CU7 installing it first would cause issues? I thought so as well. The recommended update path for those who are on E2016 & CU7 is Install .NET 4.7.1 first, reboot, then install CU9 (assuming you wanted to skip the buggy CU8)

I found this interesting and worth for mentioning about it. You can read similar verbiage on the .NET section of this article if you need MS backing.

image

https://technet.microsoft.com/en-us/library/ff728623(v=exchg.150).aspx

Oz Casey, Dedeal

Principal Systems Engineer

https://simplepowershell.blogspot.com/  (blog)

https://smtp25.blogspot.com/ (blog)

https://telnet25.wordpress.com/ (blog)

https://twitter.com/Message_Talk (Twitter)

April 1, 2018

Enable Circular logging Lync Fabric logs

Filed under: General — telnet25 @ 11:29 pm

In this article we will talk about Lync Fabric logs and now to enable circular logging to keep your drive going out of space madness. If you are reading this article, most likely you ran into similar issues.

To enable circular logging, you will need to use following steps

1. log onto Lync FE server via Remote Desktop Protocol (RDP)

2. Make a right click on Windows PowerShell and select | Run as Administrator | press enter

3. Accept UAC warning by clicking yes

4. On the elevated PowerShell command prompt type following | and press enter

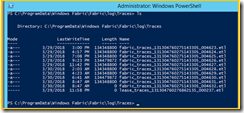
cd ‘C:\ProgramData\Windows Fabric\Fabric\log\Traces’

image

Type following command and press | enter

Logman update trace FabricLeaseLayerTraces -f bincirc –cnf

6. From PowerShell type | Perfmon | press enter | navigate to following section within the Performance Monitor MMC.

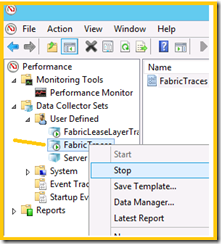
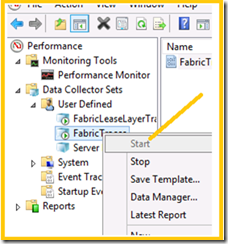
7. Expand Data Collector Sets | Expand User Defined | Select Fabric Traces |

8. Make a right click on |Fabric Logs| and select | Stop|
image

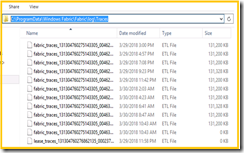
9. Go back to | C:\ProgramData\Windows Fabric\Fabric\log\Traces | location

10. From command line type | Explorer .\ | press enter to open the log directory on GUI
image

11. Highlight all the existing ELT files and delete them.

12. Go back to Performance monitor snap in

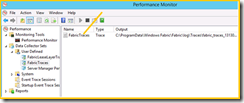
13. This time select | Fabric Traces | on the right pane and make a right click select properties

14. Click File tab on top and locate Circular check box under log mode section
image

15. Make sure | Circular (requires a non-zero maximum file size) is selected, and is set to ENABLED.

16. If not enable it
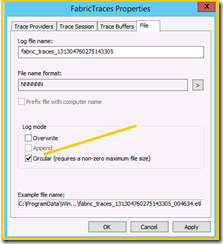
image.

17. Make a right click on the | Fabric Traces | click on start
image

Note: You will need to perform same work on all the Lync FE Servers.

Oz Casey, Dedeal

Senior Systems Engineer
http://smtp25.blogspot.com/ (Blog)
https://telnet25.wordpress.com/ (Blog)
https://twitter.com/Message_Talk (Twitter)
February 27, 2018

Adjust Exchange 2016 Mailbox Move Historical Information.

Filed under: General — telnet25 @ 2:27 pm

In large environments mailbox moves are nature of the business. For various reasons mailboxes will be moved around and each time this occurs MRS will keep last two move history logs for a given mailbox. When this information is overwritten you could end-up losing important data and this might have adverse effects to create confusions on your recovery efforts. To remediate the issue, we will adjust “MSExchangeMailboxReplication.exe.config” file to ensure we are retaining 20 moves historical information.


It could be ideal for to change these settings depending on your scenario. The settings define move history is kept within the “MSExchangeMailboxReplication.exe.config” file acceptable values are from 0 to 100 (Default is 2)


Implementation Plan:

Log onto your Exchange 2016 Server. Use your Exchange Administrator account on the logon

Click Windows tile then

Navigate to following directory

D:\Program Files\Microsoft\Exchange Server\V15\Bin

Locate “MSExchangeMailboxReplication.exe.config” file


1. Make a right click and select edit

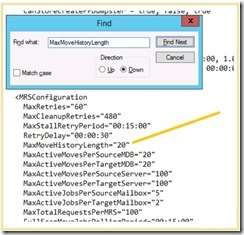
2. Press CTRL + F key to bring up Find menu and type “MaxMoveHistoryLength”

3. Press enter

4. Under MRSConfiguration locate the entry “  MaxMoveHistoryLength=”2”

5. Change the number from 2 to a desired number. We will make it 20  in our scenario

6. Click File on top and select “Save” then exit.


clip_image002

clip_image004

Oz Casey, Dedeal

Systems Engineer
http://smtp25.blogspot.com/ (Blog)
https://telnet25.wordpress.com/ (Blog)
https://twitter.com/Message_Talk (Twitter)

August 10, 2017

Exchange 2016 OU Picker is not Showing Organizational Units.

Filed under: General — telnet25 @ 1:02 am

Issue: Exchange 2016 CU5 , OU Picker is not showing Users within EAC ( Exchange Admin Center)

Cause: Web.config file needs to be modified “GetListDefaultResultSize” needs to be added with > number of existing OU ( Organizational Units) within the environment.

Notes: Web.config file is located on default exchange install directory under ECp folder “Program Files\Microsoft\Exchange Server\V15\ClientAccess\ecp”

It needs to be added with notepad ( opened with administrator privileges)

Each CU install will wipe these settings, therefore web.config file needs to be saved each time prior installing CU on Exchange 2016 Servers.

I have added few simple scripts to help you to develop baselines to implement in your environment

Web.config file is not server dependent, single file can be modified/saved and moved around Exchange 2016 servers, if desired.

  • Log onto Exchange 2016 Server, via RDP (Remote Desktop Protocol)
  • Provide your credentials at the logon.
  • Click windows tile and select PS (PowerShell)
  • Select to open PowerShell with administrator privileges
  • Type following press enter (note the installed directory)

$exinstall\ClientAccess\ecp

  • Type notepad on the PowerShell (Open notepad with administrator privileges)
  • Click file and select Open on the administrative notepad
  • Drill down to ECP directory under Installed directory ;
  • Program Files\Microsoft\Exchange Server\V15\ClientAccess\ecp
  • Locate web.config ( make sure on the bottom change to all files to locate the web.config)
  • Open web.config file

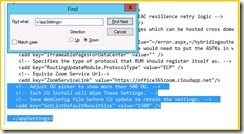
Press CTRL + F to bring up find menu and type “</appSettings>”

  • Locate the section
  • Add this line ( it does not exist in Exchange 2016 )

# below line must be edited above “</appSettings>” Section within the Web.Config File

<add key=”GetListDefaultResultSize” value="1500" />

  • Comments Added ( same line with comments)

<!– Each CU Install will Wipe This File. –>

<!– Save a backup copy of web.config file –>

<!– After CU install you can copy and paste backup web.config file –>

<add key="GetListDefaultResultSize" value="1500" />

  • Open another PS window and copy and paste one line to get the number of OU’s in your environment and note the settings.

# You can easily get your current OU count with simple one liner

# Getting OU count

(Get-OrganizationalUnit).count

  • Close web config
  • From PowerShell Type

Restart-WebAppPool MSExchangeECPAppPool

  • Perform same task on Each Exchange 2016 Server listed below

Verification

  • Open web browser and type following URL press enter, replace the server name with proper server name that is applicable for your environment

https://EX101/ecp/default.aspx

  • Provide your credentials
  • Click Recipients
  • Click New, User Mailbox
  • Select new user
  • Click Browse
  • Make sure Under “Select an Organizational Unit” Section populates the OU Structure

clip_image002

clip_image004

clip_image006

  • You will be able to see the OU’s
  • PS scripts to

# Connect Remote Exchange 2016 Server, Specify Server to connect.

# Change the server FQDN with server name you have.

Function Connect_E16 {

param(

[Parameter( Mandatory=$false)]

[string]$srv ="EXC01.smtp25.org"

)

$session = New-PSSession -ConfigurationName Microsoft.Exchange `

-ConnectionUri http://$srv/PowerShell/ `

-Authentication Kerberos

Import-PSSession $session -AllowClobber

}

Clear-host

write-host $null

Write-host "_Connecting Exchange 2016 Servers"

$Connect_E16

# Re-start MSExcangeECPAppPool Service on each Exchange Server

# (1)_.Exchange 2016 Array

foreach ($Server in $Servers)

{

$Servers = (Get-MailboxServer | ? {$_.AdminDisplayVersion -Match "^Version 15" }).name

Write-host "_Processing $Server"

Invoke-Command -ComputerName $server{

Write-host "()_Re-Starting MSExchangeECPAppPool Service "

Restart-WebAppPool MSExchangeECPAppPool

Write-host "_()Done" -f yellow

Write-host $Null

}}

# Check Server Health

<#

.NOTES

#=============================================

# Script : Health_Check_Required_Services.ps1

# Created : ISE 3.0

# Author(s) : casey.dedeal

# Date : 08/09/2017 09:23:23

# Org : ETC Solutions

# File Name :

# Comments :

# Assumptions :

#

#==============================================

SYNOPSIS :

DESCRIPTION :

Acknowledgements :

Limitations :

Known issues :

.EXAMPLE

.\Health_Check_Required_Services.ps1 .ps1

Description

———–

Runs the script to perform health check on Exchange 2016 Servers

#>

clear-host

write-host $null

#(a)_.Re-start MSExchangeECPAppPool Service On all Exchange Servers

$Servers = (Get-MailboxServer | ? {$_.AdminDisplayVersion -Match "^Version 15" }).name

#(b)_.Foreloop

$Foreloop = foreach ($Server in $Servers)

{

Write-host "_Checking $Server Health" -f yellow

Test-ServiceHealth | select Role,RequiredServicesRunning,ServicesRunning,ServicesNotRunning

}

#Out-Grid Results

$Foreloop | Out-GridView

Make backup for Web.Config File

<#

.NOTES

#=============================================

# Script : Copy_Web_Config_V1.ps1

# Created : ISE 3.0

# Author(s) : casey.dedeal

# Date : 08/09/2017 09:31:30

# Org : ETC Solutions

# File Name :

# Comments :

# Assumptions :

#

#==============================================

SYNOPSIS :

DESCRIPTION :

Acknowledgements :

Limitations :

Known issues :

.EXAMPLE

.\Get-Sample.ps1

Description

———–

Runs the script to make copy of Web Config file

Specify Exchange 2016 Server Name

After each RU install you need to put the file back

#>

#(a)_.Variables

$user = $env:UserName

$dom = $env:UserDomain

$comp = $env:ComputerName

$date = get-date -Format yyyy-mm-dd

#(b)_.Source & Dest

$Source = "\\EXC01\d$\Program Files\Microsoft\Exchange Server\V15\ClientAccess\ecp\web.config"

$Dest = "C:\users\$user\Desktop\"

$file = "Web_Config_backup"

$Folder = $dest + $file + "_" + $date

$collec = $Source

write-host $null

write-host "——–$dom———-"

write-host "$user"

write-host "$comp"

Write-host "Copying Exchange 2016 Short-cuts" -f yellow

write-host "————————-"

#(c)_. Running foreach

foreach ($item in $collec)

{

If (Test-Path $source){

Write-host -fore yellow "Located $file "

New-Item -ItemType directory -Path $Folder

Copy-Item -Recurse $item -destination $Folder -Force

}Else{

write-host -fore red "Source File cannot be located"

write-host -fore yellow " Script Will Stop in 5 seconds"

Start-Sleep -Seconds 5

break

}}

Oz Casey, Dedeal
Systems Engineer
http://smtp25.blogspot.com/ (Blog)
https://telnet25.wordpress.com/ (Blog)
https://twitter.com/Message_Talk (Twitter)
May 4, 2017

The setup wizard has determined that Certificate Revocation List(CRL) checking is enabled on this computer.

Filed under: General — telnet25 @ 12:13 am

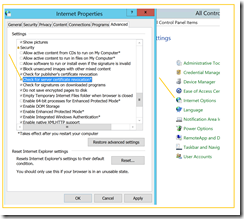
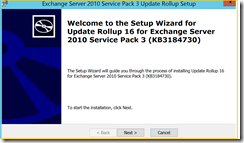
On the Server ( windows 2012 R2)  you are having the issue, make a right click on Windows tile, and select run , type | control | and press enter. From control panel click view and change it to small icons, locate “Internet Options” double click on it to go to properties.Go to advance and drill down to “Security” section uncheck | Check for publisher’s certificate revocation”” click apply and close the window. Installing RU 16 on Exchange 2010 SP3.

image

Run the setup after the changes. When finished you can revert the changes back.

image

Oz Casey, Dedeal
MCITP (EMA), MCITP (SA)
Security+, Project +, Server +
http://smtp25.blogspot.com/ (Blog)
https://telnet25.wordpress.com/ (Blog)
https://twitter.com/Message_Talk (Twitter)

March 2, 2017

Setting Throttling Policies For Cisco Unity

Filed under: General — telnet25 @ 7:27 pm

Recently I ran into issues with Cisco/Unity  within the Exchange 2010 environment. I wrote simple script to create Exchange Server Throttling policy based on CISCO’s white paper with their recommended values on the policy. Script can be found on TechNet Scripting Library

image

https://gallery.technet.microsoft.com/Set-Exchange-Server-60ff7055

Few reminders with Cisco Unity: It is configured to work with EWS.Voice message put into user mailboxes via API , so you wont see Exchange server information within the message headers.  if you are seeing random users not getting their VM, check throttling policy to make sure the recommended values set accordingly.

EWSPercentTimeInCAS             : 300
EWSPercentTimeInMailboxRPC  : 200
EWSFindCountLimit 10000         : 10000
EWSPercentTimeinAD 100         : 100

Oz Casey, Dedeal (MVP North America)
MCITP (EMA), MCITP (SA)
Security+, Project +, Server +
http://smtp25.blogspot.com/ (Blog)
https://telnet25.wordpress.com/ (Blog)
https://twitter.com/Message_Talk (Twitter)

April 26, 2016

Create installation media for IFM

Filed under: General — telnet25 @ 3:29 am

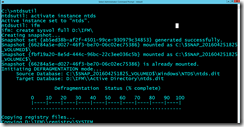
There are times, when installing domain controller, you may want to choose install from media option to start with, remote sites Domain Controllers installation. Perhaps bandwidth is the concern. In similar situations we will prepare IFM to use. Log into your domain controller as an administrator. Open Command prompt with your administrator credentials. Click start on the run menu type cmd.exe and press enter and accept any UAC prompt. At the Administrator command prompt Type:

  1. Ntdsutil
  2. activate instance ntds
  3. IFM
  4. create sysvol full <Drive>:\<InstallationMediaFolder>

image

image

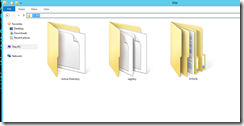
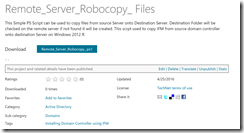
You can use Robocopy to move IFM media to destination server to prepare install from media on windows 2012 R2 environment.

image

You can download Robocopy script from TechNet Library

Oz Casey, Dedeal (MVP North America)
MCITP (EMA), MCITP (SA)
Security+, Project +, Server +
http://smtp25.blogspot.com/ (Blog)
https://telnet25.wordpress.com/ (Blog)
https://twitter.com/Message_Talk (Twitter)

April 7, 2016

Create Virtual Host via PowerShell

Filed under: General — telnet25 @ 3:43 am

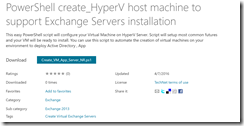
This simple PowerShell script will assist you to configure virtual machines on your HyperV Server. Script will create virtual host , create virtual hard disks and mount the ISO file. All you have to do is , start the VM and follow install wizard to complete the settings.

image

image


image

image


<#    
.NOTES
#==============================================
# Script: Create_VM_App_Server_NR.ps1 
# Created With:ISE 3.0 
# Author: Casey Dedeal 
# Date: 04/06/2016 22:58:41 
# Organization:  ETC SOLUTIONS
# File Name: Create_VM_App_Server_NR.ps1 
# Comments:  First Version
#=============================================
.DESCRIPTION
        Create_VM_App_Server_NR.ps1
==============================================
Change these variables
$path = "A:\HyperV_" ( Change the Path )
$ISOPath = "A:\ISO\en_windows_server_2012_r2_x64_dvd_2707946.ISO"
==============================================

image

https://gallery.technet.microsoft.com/scriptcenter/PowerShell-createHyperV-59fe68cd

Oz Casey, Dedeal (MVP North America)
MCITP (EMA), MCITP (SA)
Security+, Project +, Server +
http://smtp25.blogspot.com/ (Blog)
https://telnet25.wordpress.com/ (Blog)
https://twitter.com/Message_Talk (Twitter)

Next Page »

Blog at WordPress.com.